Tips and Tricks

How to build a design

One of the satisfactions of attending a workshop for polymer artists is watching how others work.

The black marks that Loretta Lam sketched across these beads gave me a clue as to where she was headed with her design. The baked gray base beads are made from blended scrap clay (ultralight and polymer) which she covered with veneers, adding a few sculptural elements and textures.

This week Loretta posted a picture of the final necklace with the juxtaposed lines, patterns and shapes all in place. The mixture of elements forces your eye around the piece and offers something interesting no matter where your focus lands.

You can read more about Loretta’s art and business in this recent interview and on her Facebook fan page. Does this make you rethink your process?


Polymer and Prismacolors

Clarks Prismacolors

Colorado’s Maria Clark shows us how a limited toolbox can force you to dig deep into your creative resources and try something new.

Maria had some time on her hands because she was traveling. She purchased a package of white clay, a small set of colored pencils and a bit of burnt umber and gold metallic paints. Her only other tools were pens, pencils and a crochet hook she’d brought along.

Who knew you could get such deep colors with Prismacolors on polymer? (See Tuesday’s post on Libby Mills to see another example.) Thanks to Marian Hertzog who sent Maria’s link along.

Retro paint

Thank goodness that Croatia’s Nikolina Otrzan revealed her painterly polymer methods in a free tutorial that she uploaded this week. Her process is hard to guess but easy once you see it done.

Nikolina starts with a crisp graphic style that she later softens and blends for a retro effect. Thanks for the tute!

Her Flickr site is full of other examples including this clever cat design. She likes to doodle on polymer.

Spring cleaning

Thanks to the eagle-eyed Facebook fans who let me know that the PCD posts weren’t appearing in FB. I replaced the dusty old 2007 plugin with a shiny new one. I guess we wore it out!

Carving tools and tricks

McNall carves

All your resistance to carving polymer will vanish once you thumb through Page McNall’s latest examples of her work and pictures of her tools.

McNall cityscape

Page shows how she often makes silicone molds of her carvings which simplifies creating subsequent similar pieces.

It helps that as a dentist, Page has plenty of access to drills, sharp tools and mold-making materials. She has a painterly way with color that’s stifled at her day job.

Press-on polymer nails

Wallis press-on nails

Claire Wallis‘ polymer nail veneers provide a clever solution to those who aren’t adept at nail decor. She bakes thin shaped slices on curved foil forms and glues the baked slices onto press-on nails. “I wanted to create polymer clay fake nails but in order to be strong enough they ended up too thick so these are paper thin slices stuck onto fake nails,” she says.

Note: I ran right out and bought some drugstore nails which melted in the oven. Then I made a mold of each size nail which allowed me to make perfectly shaped veneers.

Can you go overboard with this impractical but fun idea? If your earrings match your coffee mug and your nails, your friends may plan an intervention.

See more of Claire’s work on Facebook and on her site here.

Polymer connections

Waddington_bail1

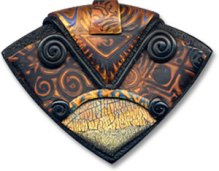
Susan Waddington of Polydogz does many things well. What I found myself stuck on as I cruised through her galleries was her ingenious bails for pendants, some from years past, some new.

Waddington_bail2

Integrating polymer bails into pendant design is quite a trick and Susan’s mastered it. She’s fond of using a paper-bead type construction which she camoflages with decorative coverings as in the shield shape with textured folded circle shown here. Layers of patterns form connections that fit seamlessly into her collages of polymer pattern.

You can see more examples on a sister site here and on Etsy here.

Polymer with magnets

Niche Award winner Melanie West enjoys the challenge of a new design and she’s engineered some clever solutions with her new polymer Ball and Star necklace shown here. A magnet secures the ball next to the star and acts as a clasp on this piece which is strung on buna cord (and check out what looks like buna rings over the cording).

She tried a similar solution using memory wire and found it too bouncy in her test drives. Melanie shares more of her design process along with some of her successes and failures in this post.

Innie/outie polymer

Massachusetts’ Roberta Warshaw creates her designs from a number of small stamps in a collection that she shows off here. Lately she’s inverted those assembled designs, creating an even more interesting effect as shown on the Faux Verdigris pendant here.

“I actually like the way they look better than the original impressed stampings. they have so much more depth this way. They feel much more like a small painting to me,” she says. See them all here and here.

When you don’t know which end is up, try making an “innie” an “outie.”

Easter polymer

Tsaliki eggs

You’d better get crackin’ if you’ve got an Easter basket to fill this weekend.

Need inspiration? Greece’s Klio Tsaliki shows bowls and baskets full of polymer covered eggs in spring colors plus decorated candles.

For some of the eggs she winds a brightly extruded string of polymer round and round for a great effect. Much less messy than dyes! Here’s her Flickr collection.

Other egg-amples should turn up in the boxes below this post.